Friday, January 10, 2014

Making A Solar Light Chandelier


It is easy!

First find a candlestick chandelier
like this Paris Flea Market Crystal Chandelier


then
go buy four of these solar lights at the Hardware store


 Next, take the top off the stick


now place the top solar part into the candlestick cup
You can glue them in if they don't hold tight


now comes the part I still laugh about....

At first, my lights would not come on that night.  
I thought, "Man, I bought duds!"
the next day it dawned on me......
I did not pull out the paper tag 
you know
that thing that slips between the power cell and the thing you bought
Ugh

so after I pull out the tabs and let them sit in the sun that day
presto
night time lighting

BAM!


Thursday, January 9, 2014

My Bell Jar Collection

Do you have something of great sentimental value?
Try encasing it in a bell jar

Antique childhood glass ornament in a Bell Jar
I twined the leaves together, highlighted them with acrylic paint and added glitter to the wet paint,  then hung my antique German glass ornament from the top.  The base was glittered using modpoge 


Wedding Topper in Bell jar
The base fabric flowers are antique that I found at an estate sale. The fabric leaves were done the same way as the last one.

Christmas in a Bell jar
This one I made on a moss covered base.  Painted the leaves more than I did in the others and again highlighted them with glitter.  I bleached out a few tiny bottle brush trees and dyed them with food coloring that I mixed together.  I added the bronze colored balls from a ball floral pick that I took apart.


Christmas Vignette in a Bell Jar
This was the German ornament last year when I added the glittered flocked deer to the vignette.   I added a few tiny glass balls and fake snow balls to complete the look.

Here are more toppers I have for sale

Fall Decoration/Cake Topper https://www.etsy.com

Spring Decoration/Cake Topper https://www.etsy.com


BE INSPIRED


Wednesday, January 8, 2014

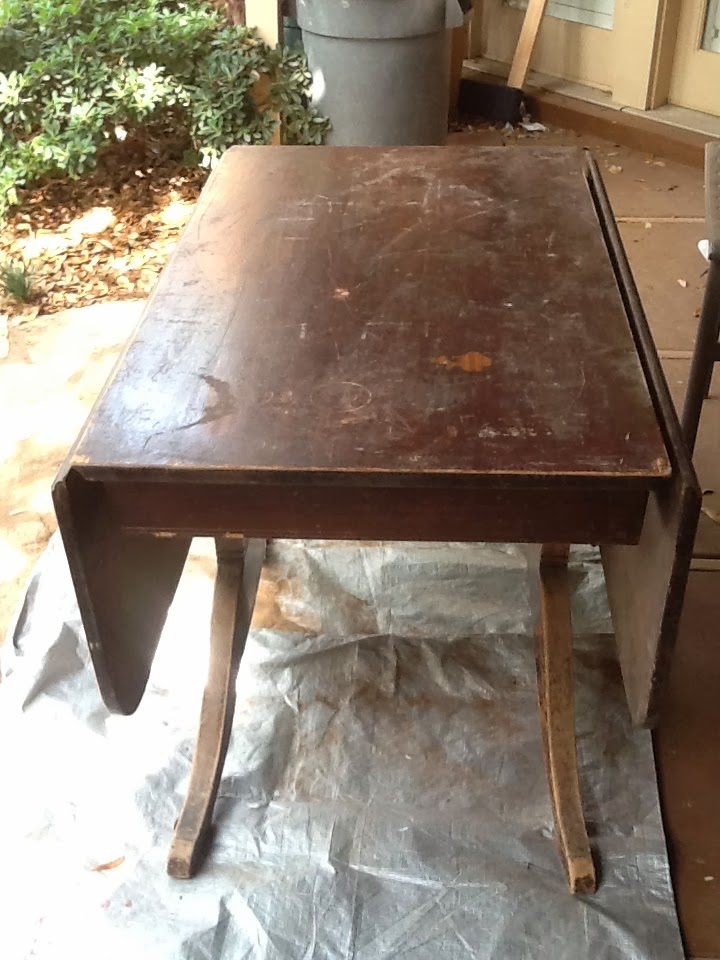
Paint a beat up Table and bring it back to Life

Remember what I said?
Look at the Bones of a piece
They don't make heavy solid wood tables like this anymore
that don't cost a king's ransom

Ugly? Yep
Beat up? Yep
Has potential?  You beat!

 Here is a dining room table that can seat 2-6 people

I sanded the finish
 grabbed a can of paint
took the drop leaves off
and painted
and
BAM!

Sold in a few months to a girl who needed a red table.


So fun to watch your pieces that you rehab find a new happy home
( I would have kept this but I had no empty spot to put it in my cottage home
.......just say'n)

Tuesday, January 7, 2014

Take something ugly and paint it


Look at the BONES of a piece

Take this cabinet for example.... It was just ok as a pine piece
but it had no pizzazz
 
nothing to write home about.

Then I sat and looked at it.  
Grabbed the paint 
and

BAM!


I love antiquing pieces with a bit of stain after the paint dries

Now it is ready for a sweet cottage room!  

KEEP YOUR EYES AND MIND OPEN
find your treasure at your next Garage or Estate Sale

Monday, January 6, 2014

Recycle Singer Sewing Machine base


I went to an estate sale and found this


it is an old cast iron Singer sewing machine base.
hmmmmmmm....
the wheels started turning
I looked around and found an old drawer 
painted the base and drawer the same antique white
distressed everything a bit
anchored the drawer to the top of the base
and 

BAM!

recycled drawer and Singer sewing machine base
Instant.....Planter for the portico outside the front door
or a funky table by the backdoor to hold keys and your purse
or place this in the bathroom to hold rolled up towels!

Sold within a few months.  Yep somebody else has great taste too!

Check out other items in my Etsy store


Sunday, January 5, 2014

Easy way to Arrange Paintings


I saw this idea on Pinterest
and it works like a charm!

First, make templates of your framed picture.  You can use Kraft paper or newspaper.  It is so easy to move everything around and change your mind without much hassle.
I used painter's tape to tape these templates to the wall. 

Next you need know where your hanger is on the back of each picture or painting
For wires: pull up and measure where it is from the top of the painting.
For saw tooth attached hanger: measure bottom of hanger to top of picture

Now that you have the measurements, You can measure off the top of your template to know exactly where the nail or bottom of your hanger hook will need to be placed.  I also measured and found the center too.

Then everything should fall into place like this.  As you can see, I changed my mind and moved things around ( I'm a woman, it is expected).

BAM!


Now I have to do the next wall, ugh

Saturday, January 4, 2014

Fireplace Surround and Mantle From Architectural Salvage Yard


The modern Fireplace was not working for me. Where am I going to display all my stuff?
 I need a mantle!
So, on one of my great adventures to go watch TCU and OU Battle it out, I stopped at an architectural salvage yard in Fort Worth, TX

http://www.oldhomesupplyhouse.com/


 I picked up two old chipped columns which had one flat side and a wood corbel that went over a doorway or window. 

Left side is before/Right side after
My Husband cut down the columns to my perfect desire
 and screwed them to the existing surround. 
He did the same to the mantle but screwed it into the studs in the wall.
 I left the wood as I found it, but I scraped a bit more off the piece I used as the mantle to get rid of the bubbled paint and dirt.

 Then I went to my Hardware Store and bought Paint that is specially formulated to be a heat barrier.  It came in a spray can and I coated the underside of the mantle self several times in the white color. 


That fireplace is a Heat-i-lator. 
It is like a mini furnace and in the winter it heats up the entire living room and my bedroom.
It is Gas powered and flips on with a switch,
 Ahhhhh gotta love an instant fire!

Want one?  Look here.  They really work well (And I am not getting paid to say that)
http://www.heatilator.com/ 

Thank you for stopping in!
stop by again tomorrow and see what's new

Friday, January 3, 2014

Making Hangtags For my Etsy Store

AskMeDecor@ Etsy Customer Tags


Here is how I make my tags.  Easy and effective!

1.  Buy Manilla Furniture tags, Find a stamp that says what your tag is for (ie My shop      
     banner is a baby zebra)
2.  Pick out a stamp ink that you like (ie vintage color for my tags)
3.  Stamp away til you can't stamp no more
4.  Cut ribbon down the center from a spool on sale. (fatter ribbon I cut 3 times)
5.  Find wax seal stamp (amazon and etsy have tons) & pick out a fine glitter
6.  Wrap your ribbon around a card and secure with a bit of hot glue
7.  Now, put a big blob of hot glue in the center
8.  Quickly!  pour a big pile of glitter onto your hot glue 
9.  And stamp down with your wax seal.  Now let this cool off for 30 seconds or until the  
     stamp can come off easily
10. BAM!


AskMeDecor tags tidy in their cubby

 And ready to use


Everything from my AskMeDecor Store on Etsy
 is wrapped up in tissue and Baker's twine,
which secures it all together.
Then I add a  personal note to the back of the tag
and it's ready to fly to it's new home


check out all the great vintage items I have
 AskMeDecor @ etsy

Thursday, January 2, 2014

Recycled moss floral basket


I have things left over from my wedding that need a new life, so let's do it!


no words needed.....

Make it 
or 
buy it in my store


Wednesday, January 1, 2014

New Year, Means Time to Re-organize The Studio

Ok, so real life does not look like this for more than a week   


Here is what real life looks like!
I know, it's a mess.  Now that the Christmas rush is over, it's time to re organize, throw out and find things I have totally forgotten about. (I am obviously a visual person)  Now, don't get me wrong, I would love to have a perfect Elfa life.  I would love to have everything beautifully organized, but I am an artist.  I can be creative OR I can be clean,
 but I can't be both at the same time.

So here are the photos of the after.  It's not perfect, but all this is crammed into one room


Would you believe I had things stacked on the tile, but now It's all cleared off.

Elfa Drawers
Everything in these Elfa drawers are by color or firing temp of the glazes.  I just used note-cards to label what is in each drawer.  Works for me!

Now the shipping department is under the table and all in one place

Here is the corporate Office.  Items awaiting listing on Etsy.com and files to be imputed into Quick books.  

Ribbon organizer
I found this idea for the ribbon holder on Pinterest.com.  It works ok, but you can see that the spools seem to unroll too easily.  

Here is the filing room.  Next to the table.  I can't really reach my files easily right now, so I am rethinking this arrangement

https://www.etsy.com/shop/AskMeDecor
Here is my Etsy store warehouse for AskMeDecor.  Every drawer and square inch is in use.

Tiny Photography studio space
This is the Photography studio.

AskMeStudio on Etsy.com
This is the Askmestudio showroom.  All the boxes in front are from the Antique mall I left and are awaiting their time in the spotlight in the photography studio and listing onto Etsy.

Here is the warehouse corner for all the Plastic Bins I use when I load up all the clay art for shows.  Display Boards are tucked away nicely too.
When you need more workspace...use a trashcan and a board. 

Coke tray Idea

I found this COKE bottle tray at a garage sale.  Great to hold all those brushes and tools for easy access as I am working.

I bought a lot of the clear shoe boxes at The Container Store. click here to buy the box at the Container Store  They are great because I can see what is in them, they have held up very well and are stronger than other brands. 

So this is a real working studio.  Not for looks, but for function.  It still has a ways to go, but it's a start.  Gotta start somewhere, right?